Monitoring indoor air quality is the only way to measure the rise of gasses, substances and other factors that are present in the air. The data collected and presented by these environmental sensors allows occupants to track the possible sources of indoor air pollution and establish actions and effective strategies to make sure that these contaminants are being controlled.

To ensure proper air quality readings and long-lasting use of your indoor air quality sensor, the right positioning, placement and care are strongly recommended. While this may be a simple task, it can often be tricky.
uHoo Aura Placement and Positioning Guide
Your uHoo Aura must be located in open spaces, within the breathing zone ranging between 900 to 1800 mm or 3 to 6 feet above the floor. This allows the device to obtain adequate samples of the air building occupants are breathing.
Additionally, your uHoo should be installed at least 5 meters away from operable doors and windows as these locations affect air movement and air flow. In areas where this practice is not possible, place your uHoo device no closer to windows than half the space, measured from the window inwards.
Similarly, uHoo must also be at least 5 meters away from air purifiers, diffusers and filters. If the space doesn’t permit, then it needs to be installed closer to air returns than air diffusers.
To guarantee the safety of the device, please place the uHoo Aura in secure locations such as mounting it on a wall that still has free flow of air. Alternatively, you may also just place the uHoo Aura on a table.
Mounting your uHoo Aura
Included in the uHoo Aura box are mounting tools.
 |
Mounting Kit:(1) Backplate (1) Mounting Tape (2) Locking Screws (4) Wall Screws (4) Wall Plugs |
To mount the device on the wall using screws:
 |
Place the backplate against the wall and mark the positions of 4 pilot holes. (Make sure the hinge is on the left hand side.) |
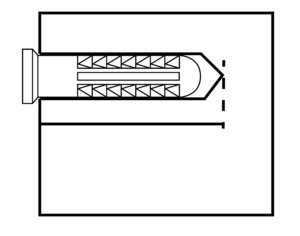 |
Drill pilot holes 25mm to 30mm in depth using a 6.5mm (1/4 inch) drill bit. Insert wall plug into each pilot hole. |
 |
Align the backplate then secure it with the wall screws. |
To mount the device on the wall using mounting tape:
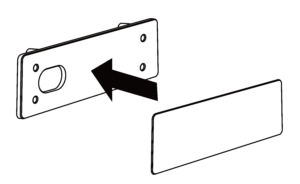 |
Peel off the white release paper and apply tape to the backplate. Then press and flatten the tape to remove air bubbles. |
 |
Peel off the opposite release paper and stick backplate to the wall. Once done, press and hold backplate for 5 to 10 seconds before releasing it. |
 |
Wait for 24 hours to achieve maximum adhesive strength before attaching the uHoo Aura to the backplate. |
Attaching uHoo onto the backplate:
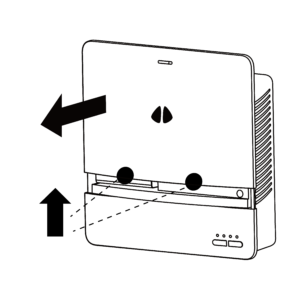 |
Connect the USB cable to the uHoo Aura. Then, remove the white front cover of the uHoo Aura by holding it on both sides and gently pushing (see two dots) it upwards. |
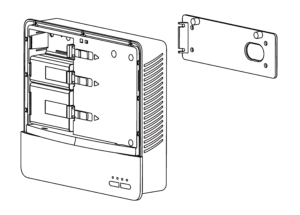 |
Hold the uHoo Aura upright and push it against the backplate until the back side of the uHoo Aura lies flat on the wall
Apply 2 locking screws on the upper left and upper right of the uHoo Aura to secure the uHoo Aura against the backplate. |
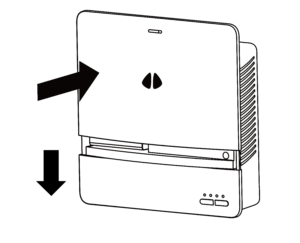 |
Reinstall the front cover by sliding it in from top to bottom. You are now ready to connect your uHoo Aura to the uHoo cloud. |
Placing your uHoo Aura on the table:
The uHoo Aura indoor air quality sensor is also available with a desk stand that acts as a supplementary support when necessary or as preferred by the user.
To place your uHoo Aura on the table, insert the protruding portion of the backplate into the groove on the back of the uHoo Aura.
 |
Place the uHoo Aura so that it sits firmly on the table.
Connect the USB cable to the uHoo Aura and thread it through the hole on the backplate. You are now ready to connect your uHoo Aura to the uHoo cloud. |
 |
Hold the uHoo Aura upright and push it against the backplate until the back side of the uHoo Aura lies flat on the wall
Setting up anti-slip mats underneath the device would also be a great help. Without the mat, the entire bottom can rest on the table. |
If there is an anti-slip mat under the device and the desk stand is fully slotted into the groove, users can simply tilt the device until its weight falls onto the desk stand, which acts as the main support.

